Complete info on TP-Link Deco Setup Process
TP Link Deco Setup
TP-Link Deco is among the best mesh wifi systems in the market. It offers users the ability to access the internet using fast internet speeds and whole home coverage. If you have purchased a new TP Link Deco recently and are looking for information on how to setup tp link deco mesh wifi system, this page is a must read for you. You will find complete information on the deco outdoor setup, the configuration through the setup wizard and troubleshooting issues with the same.
A network solution like the TP-Link router puts all the power at your fingertips. It is important to know the steps to complete the deco mesh setup process so it can perform flawlessly. This website will discuss the TP-Link Deco mesh system setup steps, so you can get started with internet access quickly.
The Deco Mesh systems let you access the internet while on the go with their Mesh network technology. The child nodes create a connected network that operates together, allowing you to move from one location to another without losing WiFi access. If you want to expand the network, just add another Deco node, and you’re all set.
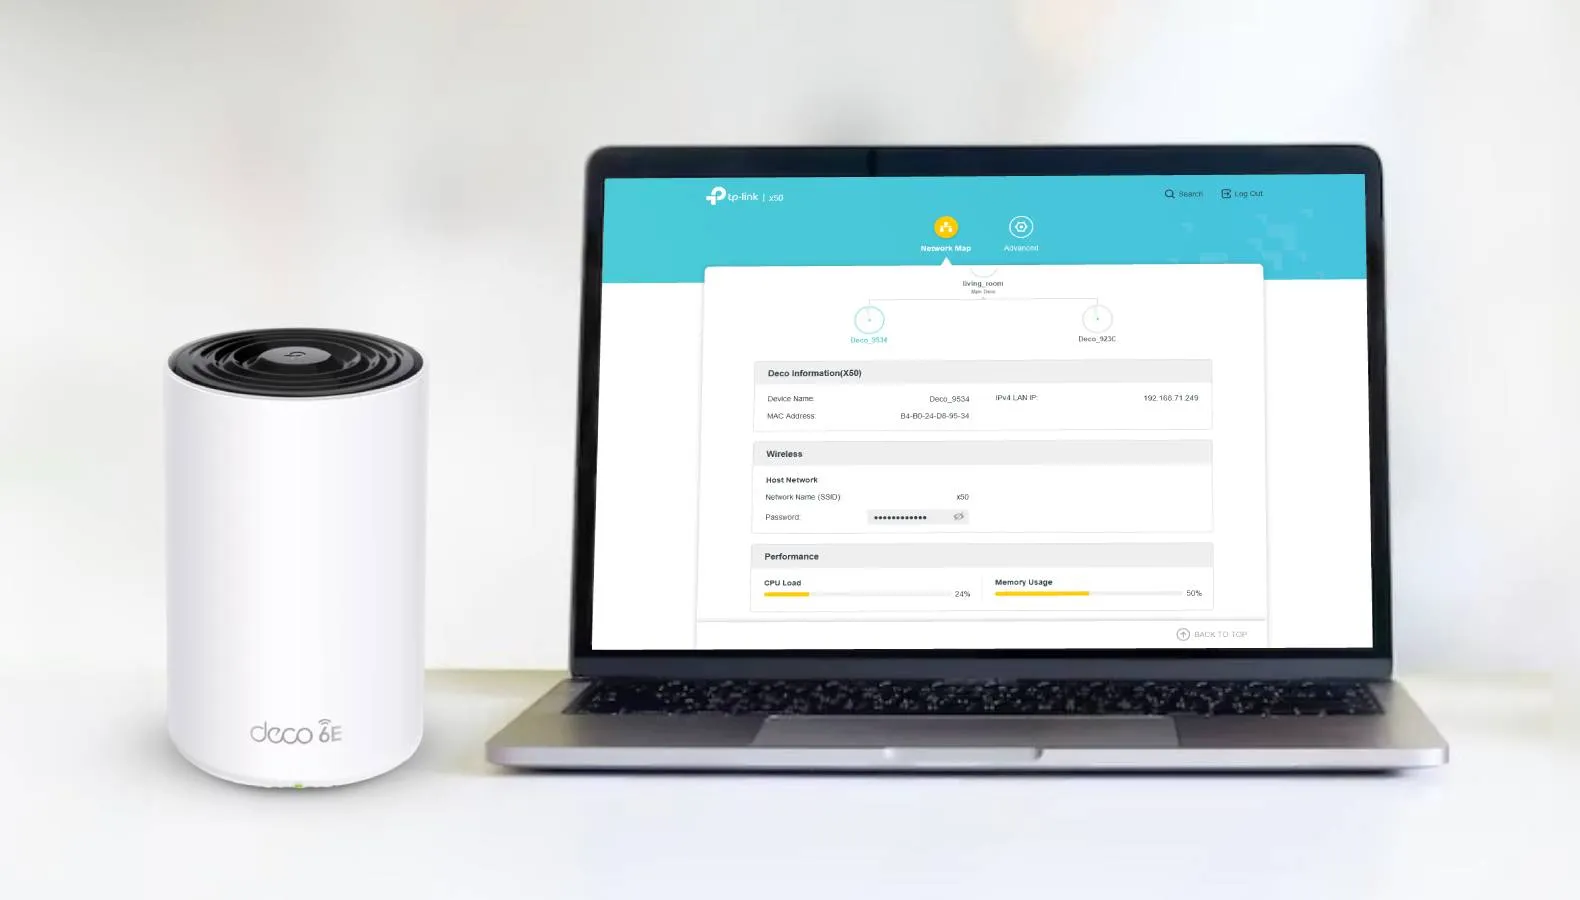
The devices can be set up for internet use with either the Deco App or the web-based tp link deco setup without app. For both processes, you’ll need some important details and equipment to proceed smoothly. After you finish the TP-Link Deco router setup, you’ll get WiFi access in various areas of your space. The different nodes work together to move WiFi signals around obstacles, ensuring complete network coverage all the time.
How to Setup TP Link Deco Mesh WiFi System?
Wondering how to setup deco tp link? You can set up your TP-Link Deco Mesh system using the Deco App or the web-based setup wizard. Before you begin, make sure to turn off power-saving mode on your phone. If you’re using an iOS device with Version 14 or later, you need to enable the local network to finish the setup process.
Once set, below are the steps to configure your Deco router:
TP Link Deco Router Setup Using Deco App
- Launch the Deco app on your smartphone and log in using your TP-Link ID. If you have a TP-Link Cloud account, you can also log in with that account.
- If not, you’ll need to create a TP-Link ID. We recommend creating one since you will need it to manage your devices later.
- Once you are logged in to the app, tap the Let’s Begin button.
- The app will prompt you to select the Deco model.
- You will see a list of Deco router models on the screen. Find the model you have and tap on it to start the deco outdoor setup process.
- Once you reach the next step, unpack the box and check that you have everything you need to get started.
- The main items are the Deco router, the power adapter included in the box, and an ethernet cable to connect the router to the MODEM at your home or office.
- Tap the Go button in the app. Follow the instructions on the screen to power off the modem. Then, connect it to your Deco Mesh router using the ethernet cable.
Initial Device Setup And Deco WiFi Setup
- Once you connect the Deco router to the modem, turn the power back on and wait for them to boot up. Allow some extra time for the Internet Light on the modem to turn solid green.
- Next, turn on Bluetooth on your phone and wait for the Deco’s LED light to start blinking blue.
- If the LED doesn’t blink blue, press the RESET button on Deco for about a second. Wait for the LED to turn yellow.
- Then wait for about 2 more minutes until the LED starts blinking blue and move on to the next steps.
- Your TP-Link Deco setup will try to find and connect to a nearby wireless device. You will see the router’s network SSID appear in your smartphone app.
- Once the app detects the Deco router, you can follow the next instructions to connect it to a room. You can also use the location as the Deco’s name.
- Once you make a selection, choose the type of internet connection, such as PPPoE, Dynamic IP, or Static IP.
- You might also need to enter the VLAN ID if your ISP requires it. Your ISP (Internet Service Provider) usually provides these details, so connect with them first. After you have the information, type in the VLAN ID and follow the remaining steps.
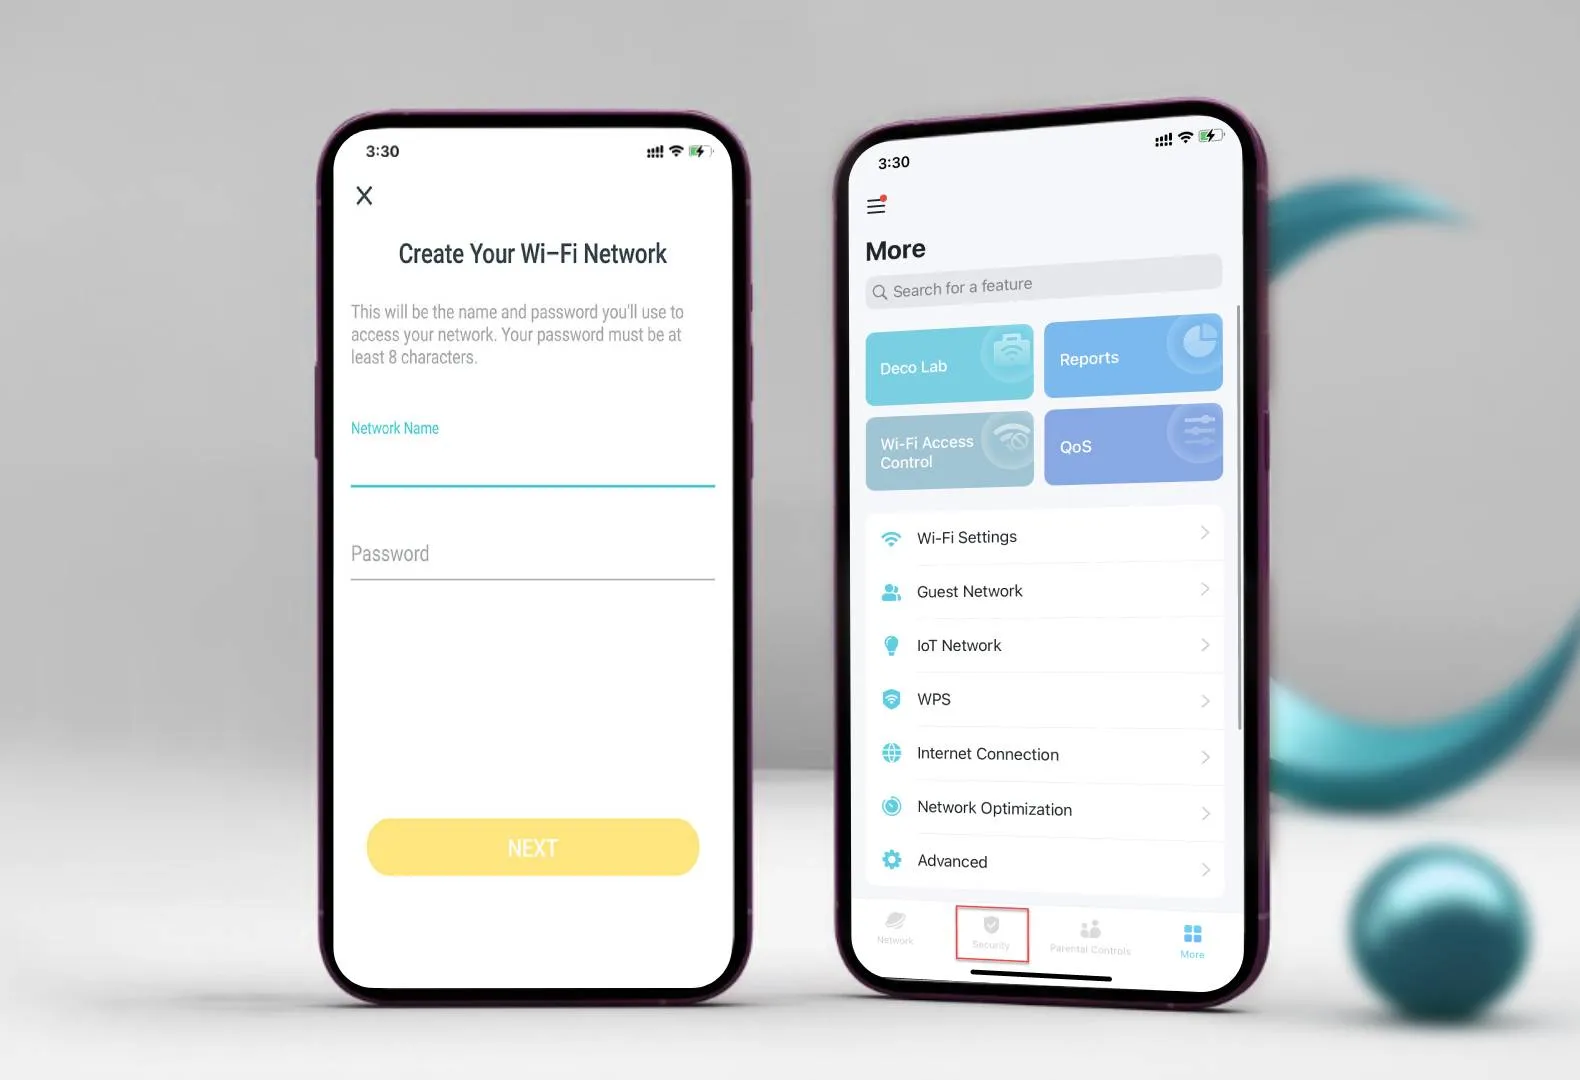
- Use the app to create a WiFi network name and password. Enter the network SSID you want for the device’s network and then type in the password.
- Write down these details; you will need them to connect your wireless devices to the network.
- Connect your phone or tablet to the Deco’s WiFi and join the network.
The TP-Link Deco app setup is now complete. You can connect all your devices to the Deco network. Tap the Done button to finish the process.
TP Link Deco Setup Without App
You can also setup TP Link Deco mesh router using the web setup wizard. You can use the default web address tplinkdeco.net or the default IP address 192.168.68.1 to access the web setup wizard and continue with tp link deco manual setup process. Here are some steps to follow:
- Connect your router to the computer with an ethernet cable. You can also connect them wirelessly using a WiFi network.
- Once connected, open a web browser. In the URL bar, type the default web address or the IP address and press Enter. This will take you to the TP Link Deco login page.
- Type in the default login credentials for the device in the appropriate fields and click the Login button.
- You can find these details on the product label or in the user guide that comes with the box.
- Once you are logged in to the Deco tp-link setup wizard, follow the on-screen instructions to set up the device settings and network settings. You can also connect additional Deco nodes to expand the network.
- Once you log in to the TP Link Deco setup wizard, follow the on-screen instructions to set up the device settings, network settings, and connect additional Deco nodes to expand the network.
- After you finish the TP Link Deco setup without app, the green light on the device will show that you can connect your devices to the Deco’s network and start using the internet easily.
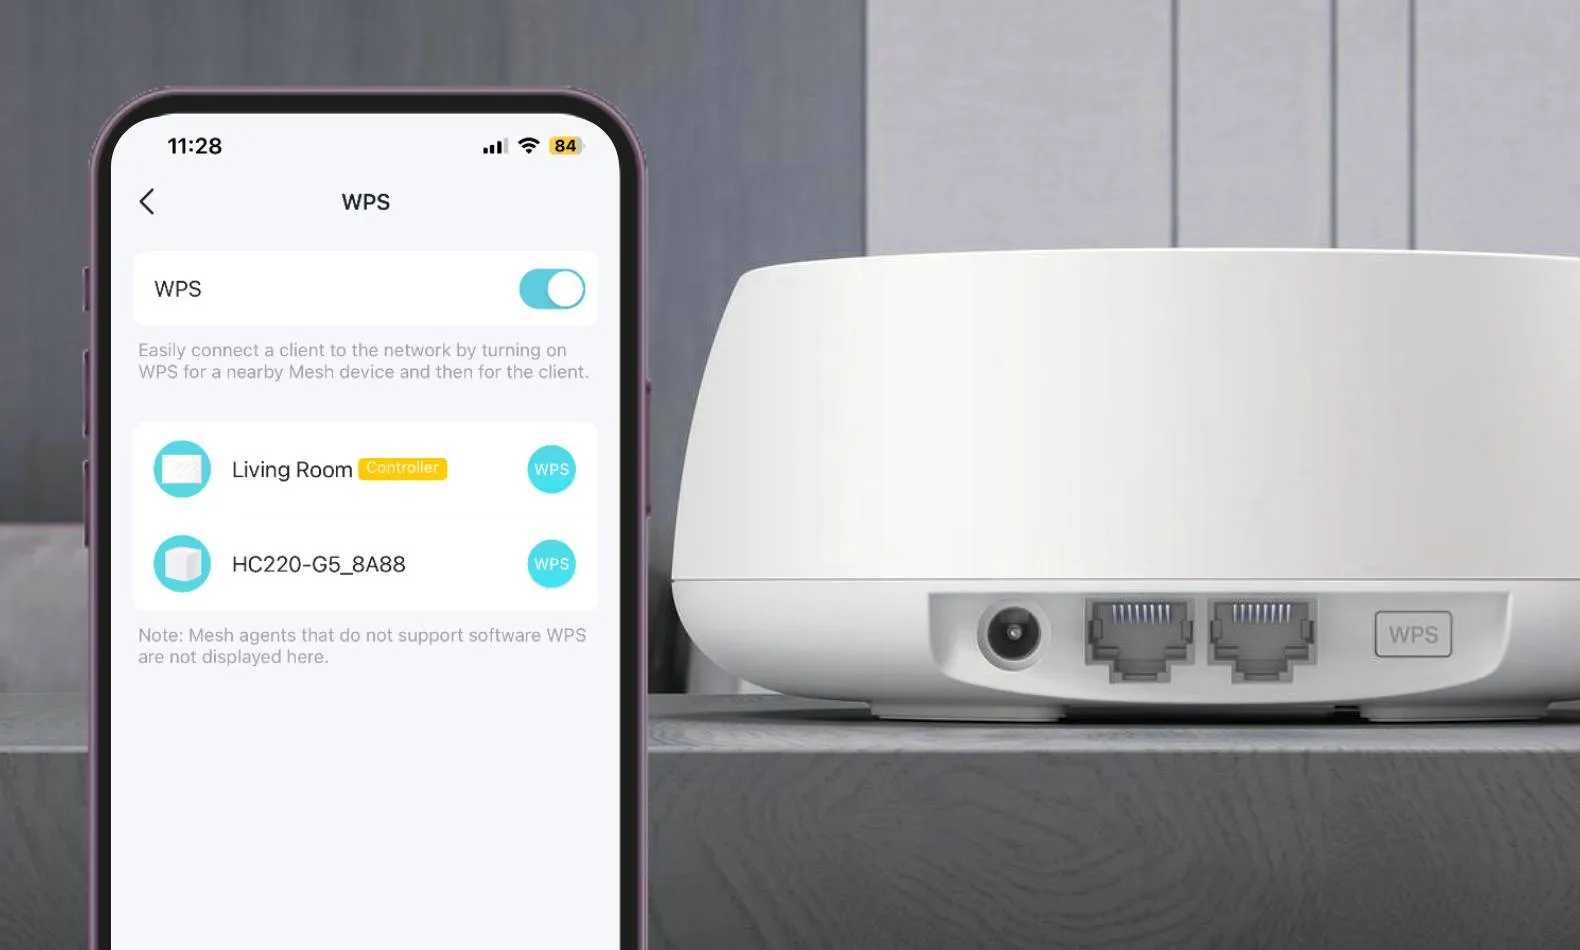
How To Setup Deco Mesh TP Link Using WPS
You cannot configure the TP-Link deco router using WPS method. WPS or WiFi Protected Setup can only be used once you have configured the network and want to connect the additional nodes to the parent router. The WPS button on the back will help you with the process. Here are some easy steps to deco tp-link setup using the WPS function:
- Locate the WPS buttons on your maine outer and the satellite router you want to add to the network.
- Press the WPS button on the satellite device and you will see the LED start to blink.
- Now within 60 seconds, head over to your TP-Link main router and press the WPS button as well. Allow some time till the two devices pair with each other and then the WPS LED will turn solid.
- Once the LED becomes solid, the WPS Setup for your tp-link deco is complete.
TP-Link Deco Setup Using Ethernet Backhaul
Completing the tp link deco ethernet backhaul setup is another way you can configure your router device. Ethernet backhaul connection provides a stable internet and device connection. It also reduces latency and improves overall network performance significantly. Below are some easy steps you can follow:
- The setup process starts with configuring the deco units. You can set up the nodes via WiFi or via ethernet. For the latter, you can connect end of the ethernet cable into the LAN port of the primary Deco router and the other end of the LAn port into the satellite device.
- If you have multiple satellites you want to connect to, you can use a network switch.
- The deco units will automatically detect the wired connection and switch the mode to Ethernet backhaul, thus enhancing the network stability and performance.
- You can then check the connection status through the Deco App. Open the deco app and go to the Network Map option. Click on a satellite deco and check teh connection status. This should indicate whether it is connected via ethernet backhaul or not.
- Once confirmed, the deco tp link setup via ethernet backhaul is complete and you can connect to the network for internet access.
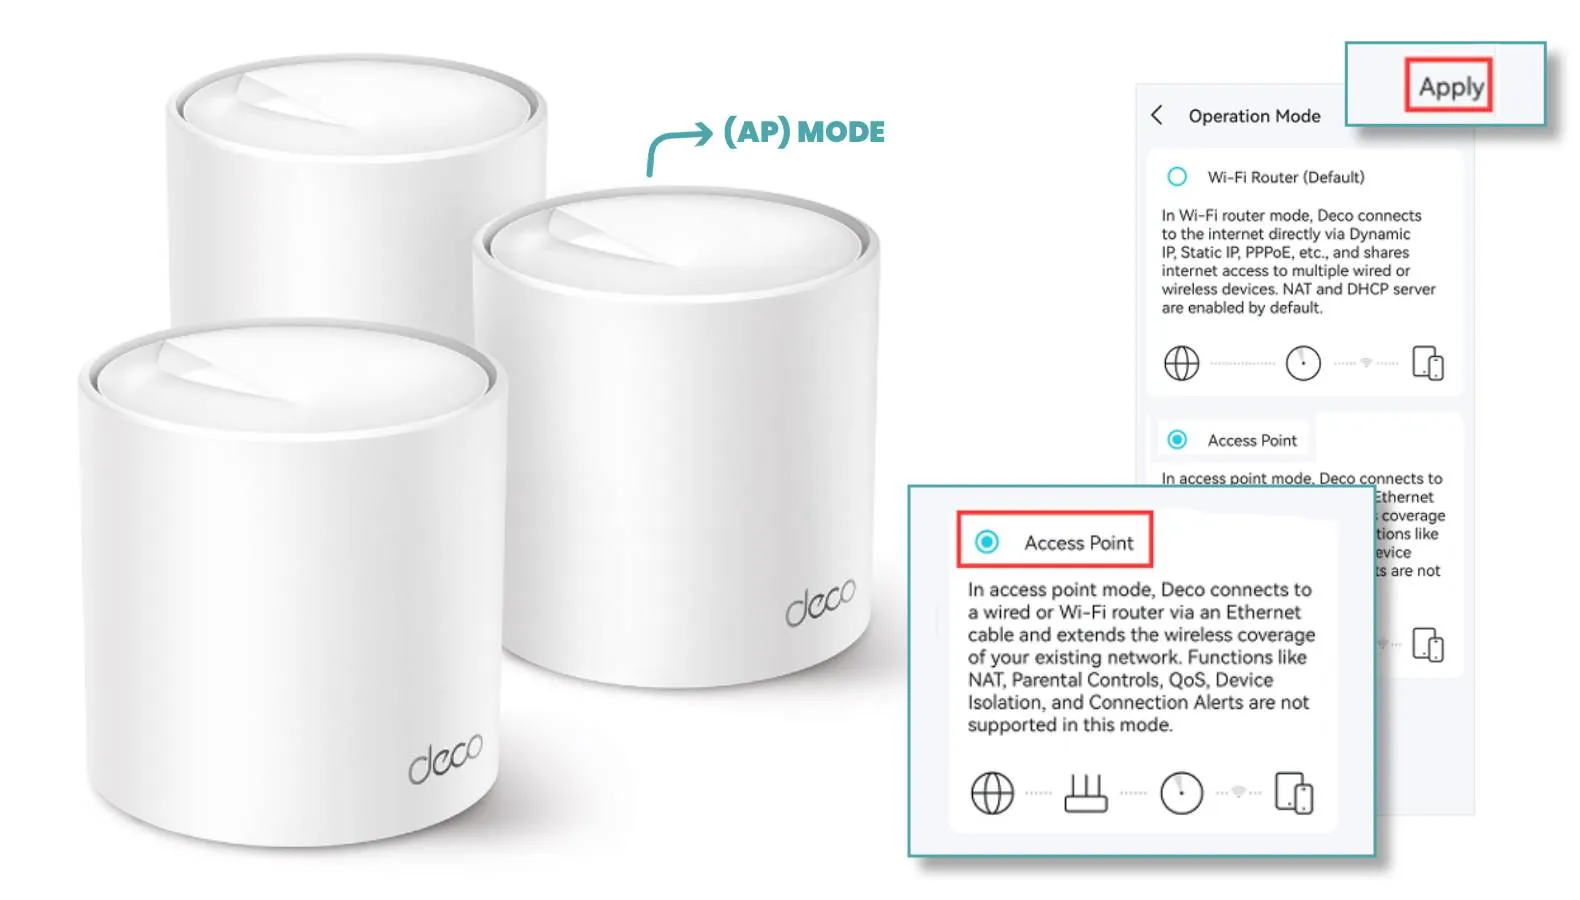
Deco TP Link Setup in Access Point (AP) Mode
You can also setup tp link deco as access point. The Access Point mode on your TP-Link Deco setup can help extend the existing wired network and improve the wireless coverage for your home network. Once the router is configured as an access point, the Deco system will not create its own subnet; it will simply forward data between the main router and client devices. Before you set up the TP-Link Deco router in Access Point mode, here are some things to keep in mind:
- Make sure the Deco’s firmware is up to date to use the Access Point mode. If you’re unsure, open the Deco App and tap the More button.
- Go to the System section and then tap Update Deco to see if a new version is available for your device.
- Also, confirm that the Deco App on your device is the latest version. This will help you use the AP mode easily.
- When in access point mode, the TP-Link Deco mesh setup will not serve as a DHCP server to assign IP addresses to client devices. Therefore, make sure the DHCP server function is enabled on the main router.
Since all client devices are managed by the main router, some features might not be available in the TP-Link Deco App. These features can include Antivirus, Parental Controls, Port Forwarding, Address Reservation, and TP-Link DDNS. You will also be able to use the Ethernet Backhaul in this mode.
Once you have confirmed that your device meets all the requirements, you can follow the steps to complete the TP-Link Deco setup as an access point.
- Connect your smartphone with the app to the Deco router’s WiFi network and open the app.
- Tap on the More button, then go to Advanced to select the Operation Mode option.
- From the available options, select Access Point and then tap Apply.
- The app will alert you about the reboot that will occur after you tap Apply. Tap the Ok button in the prompt, and the device will reboot.
- The progress will show up on the app. Wait until the device finishes rebooting, which should take about 2 minutes.
- Once the LED on the device turns solid green, the Deco system will begin working in AP mode.
Your TP-Link Deco Setup is now ready to operate as an access point.
How to Create TP Link ID Password
How To Setup Guest Network On TP Link Deco
Change The Parental Controls On TP Link Deco
Login to the Deco app and go to the parental controls tab. Here, you can edit existing child profiles, add and remove devices and adjust time limits if needed. Some features need HomeShield Pro subscription. You can set content filters by blocking specific websites or categories. You can manage internet access times, daily usage and also filter content like apps, or keywords directly in the app for granular level control. Once you are done making the changes, simply save them and the changes will take effect.
Common TP-Link Deco Setup Issues & Fixes
- Deco not detecting internet
- App not finding Deco
- Slow speed
- Problem with the guest network
Here are some general troubleshooting steps you can follow:
- If you are trying to complete the WAN setup and it fails, switch to a wired connection. Use an ethernet cable to connect your devices. If you’re already using a wired connection, try a different cable.
- Change the ethernet port on the main deco unit. Connect a laptop directly to the modem and check if the service works now.
- If the LED on the router is off and doesn’t blink, consider changing the power adapter and outlet. Use a different adapter and power outlet from the packaging.
- If the LED on the Deco router is not pulsing blue, you can reset the device to factory settings. Find the RESET button on the bottom of the Deco router, press it for about a second, and then release it.
- When the LED on the main Deco unit turns yellow, wait about 2 minutes until the main LED starts pulsing blue.
- If the LED on the device is solid green or white, it means the WiFi has already been set up. You can force close the Deco app and go to Settings on your smartphone to select WiFi and manually connect to the new WiFi network.
How To Secure TP Link Deco Network?
TP-Link Deco Reset & Re-Setup
You can easily reset TP Link Deco mesh setup using the reset button on your device. Here are some simple steps to follow: Locate the reset button on your device. Press and hold it for a few seconds until the LED changes to yellow, then release the button. Allow about 2 minutes for the device to reboot. After that, you can reconfigure the device settings. The TP-Link Deco router reset process is now complete. You can start the setup process from scratch to reconfigure the network and device settings.
Firmware Update On TP Link Deco
FAQs
Can I set up TP-Link Deco without the app?
Yes, you can always set up your tp-link deco router without the app. The tp link deco manual setup using the web address can help you with the process. Use the default web address tplinkdeco.net or the Ip address 192.168.68.1 to access the setup wizard and follow the steps to get done with the setup.
How do I add another Deco unit?
Can I use TP-Link Deco with my existing router?
What Should I Do If I Forgot My TP-Link ID Password?
What do the TP-Link Deco LED colors mean?
Can TP-Link Deco work with any modem or router?
Have more questions on TP Link Deco Setup process?
Get help from the experts at our end, today!